
Using 3D Model Assets
The main ingredient of any Augmented or Virtual Reality experience are 3D models, either static or animated. Using the AR-media Studio tools you can import and use complex 3D models to present your products to customers or projects to your clients. In this section you will find important information that will help you get the most from the platform’s tools.
Requirements
Preparing 3D models for mobile devices demands a little bit of attention especially considering the limited amount of computational resources available on that kind of devices. In particular, when dealing with 3D assets you should care about the geometry of the 3D model (number of vertices, polygons, …) and the textures used by the model, everything will play a role determining how good the final user experience with that asset will be. To start with, the supported 3D assets should comply with the following requirements:
- File types: FBX, ZIP
- File size (MB): < 50
You can use either a single FBX file or an archive (ZIP) containing a single FBX and a folder with the textures used by the 3D model. FBX is a file format created by Autodesk and available in many 3D content creation software like Autodesk 3ds Max, Autodesk Maya, Maxon Cinema4D, Trimble SketchUp, Blender and more. The advantages of using the FBX format are:
- Textures can be embedded along with the geometry into a single file
- Animations are supported (both rigid body transformations and rigging)
In order to get best results please keep in mind the following recommendations (if applicable) when exporting your models to FBX from any content creation software:
- Choose the BINARY format (as opposed to the ASCII or textual format)
- Choose to embed media (textures) into the exported model
- Choose to embed animations if the model contains them
- Use the latest version of the FBX exporter available (if you don’t get a good result then try with an older version until you are satisfied)
- Verify the up axis option, possible values are typically Y-up or Z-up, if your model looks rotated on its side then try the other option and export again
Importing 3D Models
To import models into the AR-media Studio platform you can either upload them directly into the Asset Manager or import by means of any of the AR-media Plugins (such as the AR-media Extension for Trimble SketchUp or theAR-media Plugin for Autodesk3dsmax). When you rely on a plugin or extension you don’t have to take care about exporting parameters, everything is set for you automatically, whereas when you manually export a model you should always keep in mind the above recommendations. Moreover when you use a plugin or extension your model will be automatically uploaded and made available in the Assets Manager without any further action required, instead to actually upload a manually exported model into the Assets Manager you have to click the + button in the Assets Manager toolbar and either choose the 3D Models or 3D Models (ZIP) options which will open a window:
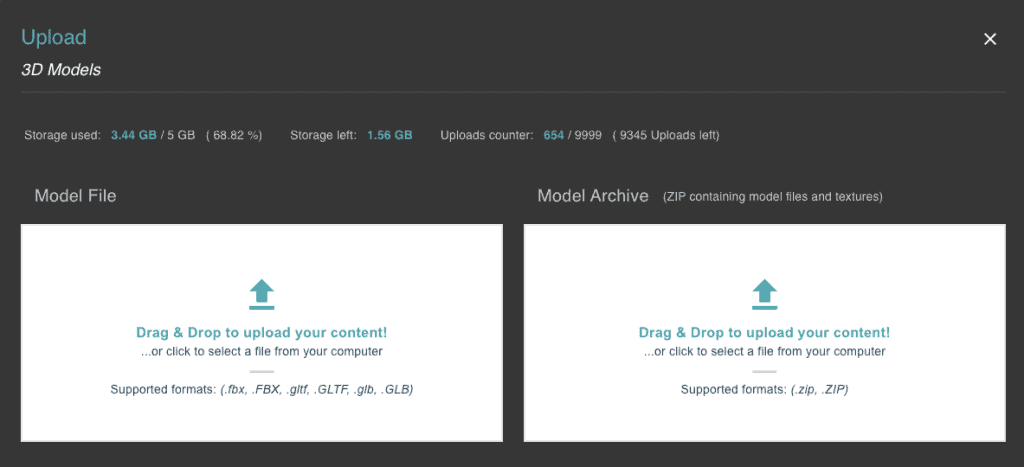
You can move your model file or archive into the respective drag & drop area and when the upload is completed the 3D Model assets will be prepared by the Assets Manager, this could require a few seconds depending on the size of the 3D model.
When the import is successful you will see the imported 3D asset in the Assets Manager, listed with the same name as the file uploaded. You can preview the 3D asset by selecting it from the Assets Manager. A small preview with details about the model will appear on the right hand side of the screen:

From the model details panel you can: Download the model file using the down-facing arrow icon, or preview the model in bigger window using the eye-shaped icon or, finally, you can generate a QR code that can be scanned by the AR-media Player app to preview the model in Augmented Reality.
NOTE: 3D model previews could be different in the web 3D editor and in the mobile app, so it is advisable to try both previews in order to be sure that a model is correctly displayed.
WARNING: When you preview a model with the AR-media Player using the QR code, the model would be scaled automatically to allow you to see it in a small environment (your desktop or your room), so the model could look smaller than it actually is. If you want to preview models using their original size you should un-check the “Auto-scale Test Models” option in the AR-media Player’s settings. Also note that the mobile preview of a single 3D model is analogous to a simple spatial project containing just that model.
Geometry Complexity and File Size
Always keep in mind that the platform, and specifically the Scene Editor and the mobile app, manage 3D models in real-time. Considering that the computational resources available especially on mobile devices can be quite limited, in order to create smooth experiences you should care about keeping the 3D models as much optimized as possible. This is even more important if you plan to distribute your projects to a huge number of users that may have very old devices and that could not be able to play the experiences as nicely as you expect.
To this regard it is mandatory to keep an eye on the model file size, which will affect the downloading and loading times of experiences (that reflect in potentially long waiting times for your users). Even though the platform allows you to upload quite big 3D models, you should try to keep the file size below 10MB especially if your project is made of many different experiences each using different 3D models:
- Keep the 3D model file size as small as possible (< 10MB) especially if using multiple models in the same project, experience or scene
Of course you can still use bigger models if the project contains just that model or a few more little models. 3D model file size is directly proportional to the number of vertices and to the number and size of textures eventually contained in the model itself. Regarding the number of vertices, even though both the Scene Editor and the mobile app can handle quite complex 3D geometries (millions of vertices in many cases), you should always try to keep the complexity as small as possible to be sure that every user will enjoy the experience the most:
- Before exporting a model reduce the number of vertices to the minimum possible especially if you plan to use it along with many other models in the same scene
- Prefer to use textures to show details instead of modeling with a high number of vertices
To reduce the number of vertices you usually can rely on semi-automatic tools available in many content creation software (for example the ProOptimizer modifier available in Autodesk 3ds Max).
When dealing with textures:
- Use the lowest resolution possible while keeping a good visual appearance
Indeed, remember that, usually 3D models occupies a small area of the mobile device screen which typically can be as wide as 2k pixels or more, so if your textures are as small as 512 pixels (0.5k) or even smaller you will still get very good results. Moreover for very small surfaces consider using very small textures, such as 32×32, 64×64, 128×128 or 256×256 and use higher resolution textures only for wider parts of your model (or if you plan to get very close to the model?s surface), in this case consider using 1024×1024 or even 2048×2048 textures sizes.
Talking about textures size, for efficiency reasons, it is advisable to use sizes that are “powers of 2“, like the examples above, this meaning resolutions expressed by the formula:
2k x 2h
where k and h are whole numbers:
- Use resolutions that are expressed by a “power of 2” (32×32, 64×64, 128×128, …)
Note that k and h can be not equal, i.e. you can use different powers of 2 like 128×32, 1024×256 and so on.
When talking about textures files formats, you should rely always on formats that can be compressed:
- Always use JPG or PNG file formats
Materials, Transparency and Colors
In some cases, you do not want to use textures for your models, instead you just want to use flat colors, in these cases do not rely on the color that you see in your 3D software’s editor because they usually do not correspond to a real material, instead they are used only to distinguish between different objects in that particular 3D software, so:
- Always assign a material to all the geometries of your models, regardless of the fact that you plan to use textures or just colors
For example, if you want to have a red box, just create a very simple material and select the red color for the diffuse channel.
Both the Scene Editor and the mobile app support what is usually called ?Standard? or ?Basic? material, so be sure to select this kind of material in your preferred 3D software before exporting your models. Here are some common guidelines regarding materials and textures:
- Always use the ?Standard? material type which can rely on the following channels: diffuse (color or texture), ambient color, specular color and shiness
- It?s advisable to have a single geometry/mesh for each model file, with a single material, with or without textures (even if this is not mandatory at all)
- You can use PNGs with transparency
- Do not use neither procedural textures nor photorealistic or advanced materials
- Do not use shaders different than the basics (Blinn, Phong, ?)
NOTE: In some cases, if you use photorealistic or advanced materials effects you should consider to “bake” the model’s textures using what is called a “render to texture” procedure, this depends on the actual 3D software and rendering engine you use, so feel free to search the Web for details about how to apply this procedure to your cases.
Even if you can have multiple meshes inside the same 3D model file, it is strongly advisable to have a single mesh especially when the model also has animations.
Improving Visual Appearance
To improve the visual appearance of your models you may consider to add Ambient Occlusion effects or (static) shadows. How you do this depends on the specific 3D software you use to create models but, in any case, in order to have those effects visible in the AR-media Platform you should use the render to texture (or texture baking) technique mentioned above in the Materials, Transparency and Colors section.
To get the best appearance for your models please refer to the Visualization Modes section.
Position, Scale and Orient your Models
Even though you can always rely on the Scene Editor to arrange your models, your life would be much easier if you consider to use your 3D software to position, scale and orient the model’s geometries correctly before exporting it.
Indeed you should keep in mind that when you create AR experiences, the units that are used are meters, so if you create a box 100 units wide it will be shown in Augmented Reality as big as 100 meters. Also, every 3D model has an origin or pivot point that usually is the point (0, 0, 0) and this will be used to center the model in your scenes in the Scene Editor and consequently in the final AR experiences, but if the model is not centered around the origin in the first place, but for example is 1000 units away, then you won’t be able to see it correctly in the Scene Editor, moreover since scaling and rotations happens with respect to the model’s pivot point or origin you could have very hard times to correctly arrange the model in your scenes. So:
- Always position your model in the origin (0, 0, 0) before exporting it
- Always think about the dimensions of the model and the intended usage: for geo-located or spatial experiences units are always meters, so the model scale should be 1:1, for planar experiences, units could be considered centimeters and the model is automatically scaled to fit the planar trigger so dimensions do not matter as much as the other cases
You must also care about objects that are placed very far away from the main objects of your 3D model. Indeed, if you do not set explicitly the model?s origin in a suitable point (presumably around the main objects) then the whole model may be not visible because the Scene Editor could try to center the model somewhere between the distant and the main objects and this could result in a position where potentially there’s no geometry to display, so:
- Take care about distant objects within 3D models, especially if they are small compared to the rest of the model
Finally:
- Before exporting a 3D model, it is advisable to remove any entity that is not a geometry (lights, cameras, helpers, …)
Animations
Animations add a lot to the user’s final experience and with the AR-media Platform you can leverage on both rigid body transformations (model’s translate, rotate and scale) and rigging (bones systems, skinning). In general:
- Always use keyframe-based animations
Regarding rigid body transformations:
- Transformations must be applied to whole meshes not to single/individual vertices or a subset of mesh’s vertices
Regarding bones systems and skinning:
- It is strongly recommended to use bones systems that are completely connected, this meaning that every single bone must be connected to some other bone in the same system
Usually, 3D model’s animations are considered to exist at the file level, this means that if you want to animate different objects in the same scene you should export different FBX files each containing a different animated model, this will allow you to manage animations independently from each other in the same scene (on the other hand you can have multiple animations in the same FBX file if you intend to manage them as a single animation within a scene).
When you author animations within your 3D software you usually can give names to each animation clip (or take), by doing so you can refer to. and manage, animations individually. Furthermore, you can specify that a particular animation clip (or take) begins at keyframe 0 and ends at keyframe 100, whereas another clip (or take) starts at keyframe 101 and ends at keyframe 150 and so on. If you provide names to each clip (or take), then you will be able to manage them also within the AR-media Platform, in particular when you author scenes in the Scene Editor.
If you find out that some animation is not working as expected in the Scene Editor or in the AR-media Player app, you could try the following suggestion:
- If you experience any issue with an animation, try to check the “bake animations” option (if available) before exporting your 3D model